Prerequisites
The reader should know about:
- Basic mathematical concepts and notations like a function, etc.
- Basic programming concepts like loops, variable declaration, etc. The concepts related to the internal (e.g. time, os) & external packages (e.g. NumPy, OpenCV) have been covered in this blog.
Introduction
In the first lecture of Harvard’s CS50 course [1], I came across the idea that digital images are a collection of “picture elements” or “pixels” and each pixel can be represented by a collection of integers, which itself can be represented by a combination of zeros and ones called as “binary numbers”. Fascinated by the idea that images are a collection of integers, I wanted to tinker with digital images, but since, I didn’t know much about digital image processing, so I started looking for resources [2] and I stumbled upon a computer vision library called “OpenCV”.
Since I knew a little bit of python, so a couple of things which I wanted to try were:
- Capturing an image using my laptop’s webcam.
- Storing the pixels of an image in a text file.
Fundamentals
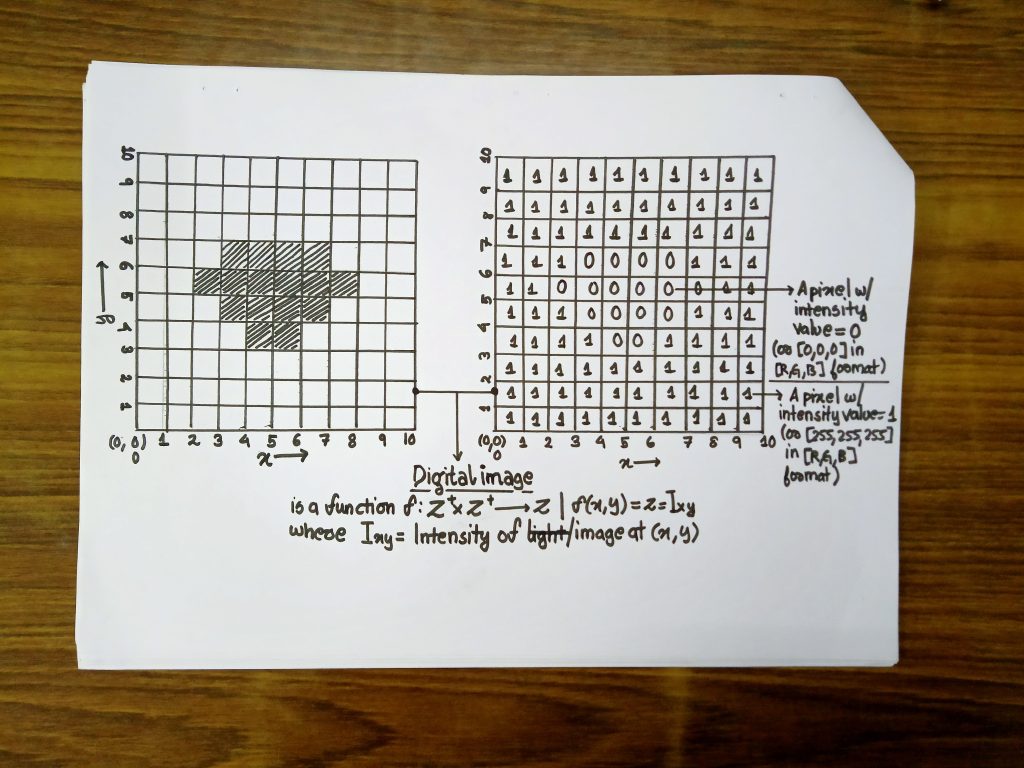
The grayscale and binary digital images can be represented by a function f : (Z+)*(Z+) => (Z+) | f(x,y) = I(x,y), Z+ = Z∩{Z-} & I(x,y) = Intensity of image at the coordinate (x,y), though the range of I(x,y) differs for both grayscale & binary images. In the case of a colour image, each pixel at the coordinate (x,y) is mapped to a collection of three intensity values for red, green & blue colours, R(x,y), G(x,y) & B(x,y).
Here are the different possible values for I(x,y) for different types of images:
- For a black-and-white image or binary image, I(x,y) only has two values, 0 & 1 or
I(x,y) = {0,1}. - For a greyscale image, I(x,y) has 256 values, which vary from 0 to 255 or
I(x,y)=[0,255]. - For a colour image, a pixel at a coordinate (x,y) is mapped to three intensities instead of one, which is R(x,y), G(x,y) & B(x,y), which are the intensities of red, green & blue colour, each of which varies between 0 to 255 or
R(x,y)=[0,255],G(x,y)=[0,255]&B(x,y)=[0,255].
In this blog post, I try to explain two programs which cover:
- Capturing an image from my laptop’s webcam & storing it as an image file.
- Converting an image into a TXT file which stores the [R, G, B] values of each pixel of the image.
Program #1 : Capture an image & store it in a file
GitHub link: https://github.com/asxyzp/ExperimentsInCS/blob/master/Image/ImgCapture.py
Basically, the primary task here is to capture an image from a camera (in this case, my laptop’s webcam). Like all cameras, there should be a way to capture the image after a discrete interval of N seconds.
To achieve the same, the time module has to be used. More specifically, the time.sleep(N) method can be used to freeze the execution of the program for N seconds. Additionally, it’ll be beneficial if a prompt about the number of seconds after which the image will be taken, was provided. This is implemented in the code below.
#IMPORTING MODULES
import cv2
import time
noOfSec = 0
while noOfSec<=1:
  noOfSec = int(input("TAKE PHOTO AFTER (IN SEC)?\t"))
  if noOfSec<=1:
    print("ENTER A NUMBER GREATER THAN 1\n")
for i in range(1,noOfSec):
  print("PHOTOSTREAM TO BE TAKEN IN ",i," SECONDS(S).")
  time.sleep(1)
Now coming to the part of actually capturing the image, which is made possible using the, VideoCapture class, imported from the cv2 module (using the import statement, import cv2) which allows capturing of video from image sequences, videos or cameras.
cv2.VideoCapture(index) returns a photo object, where the index parameter allows choosing from the primary or secondary camera, which, index=0 means that the image is being captured from the device’s primary camera.
To read the contents of the photo object, the read() method has to be used on the output of cv2.VideoCapture(index). This returns a tuple with two values that contain:
- A boolean value which reflects whether the frame has been captured correctly.
- A NumPy array [4] that will store the image’s pixel values.
Now, if the image has been captured properly, then it has to be stored in an image file, which can be achieved using the cv2.imwrite(nameOfFile,Frame) method where Frame is the second value of the tuple containing the pixels of the image in a NumPy array & nameOfFile is the string containing the name of the image file (e.g. asxyzp.jpeg). Finally, the photo object has to be released. The part of the program to achieve this has been implemented below.
#CONTAINS PHOTO OBJECT
PhotoObj = cv2.VideoCapture(0)
#RETURNS TUPLE CONTAINING BOOLEAN VALUE & PHOTO FRAME
PhotoTuple = PhotoObj.read()
#IF THE IMAGE HAS BEEN PROPERLY CAPTURED
if PhotoTuple[0]:
  #NUMPY ARRAY WHICH CONTAINS PHOTO FRAME
  Frame = PhotoTuple[1]
  #PROMPTING USER TO ENTER FILE NAME TO STORE IMAGE
  nameOfFile = input("Name of file? ")
  nameOfFile = nameOfFile + ".jpeg"
  #WRITING IMAGE IN FILE
  cv2.imwrite(nameOfFile,Frame)
  #CLOSING CAMERA
  PhotoObj.release()
#WHEN THE IMAGE HAS NOT BEEN PROPERTLY CAPTURED
else:
  print("The Frame has not been captured correctly")
  PhotoObj.release()
Program #2 : Converting Image into array/list & storing it into a text file
GitHub link: https://github.com/asxyzp/ExperimentsInCS/blob/master/Image/ImgToArr.py
Firstly, to fetch and store the pixel values (R,G,B) for a digital image, it is necessary to check whether the image file exists or not. To check the existence of the image file, the method os.path.isfile(nameOfFile) has to be used, for which the os.path sub-module has to be imported. The method checks, whether the file exists, is in the directory or not & returns true or false.
If the image file exists, then the image file has to be read and stored in a NumPy array. To do this, we’ve to use the cv2.imread(nameOfFile,FLAG) method, where the first parameter is nameOfFile, which is a string containing the name of the file & the second parameter is a flag that denotes what type of image is to be loaded and it can have three possible values:
- cv2.IMREAD_COLOR for loading color image.
cv2.IMREAD_GREYSCALEfor loading greyscale image.cv2.IMREAD_UNCHANGEDfor loading greyscale and image w/ no changes made
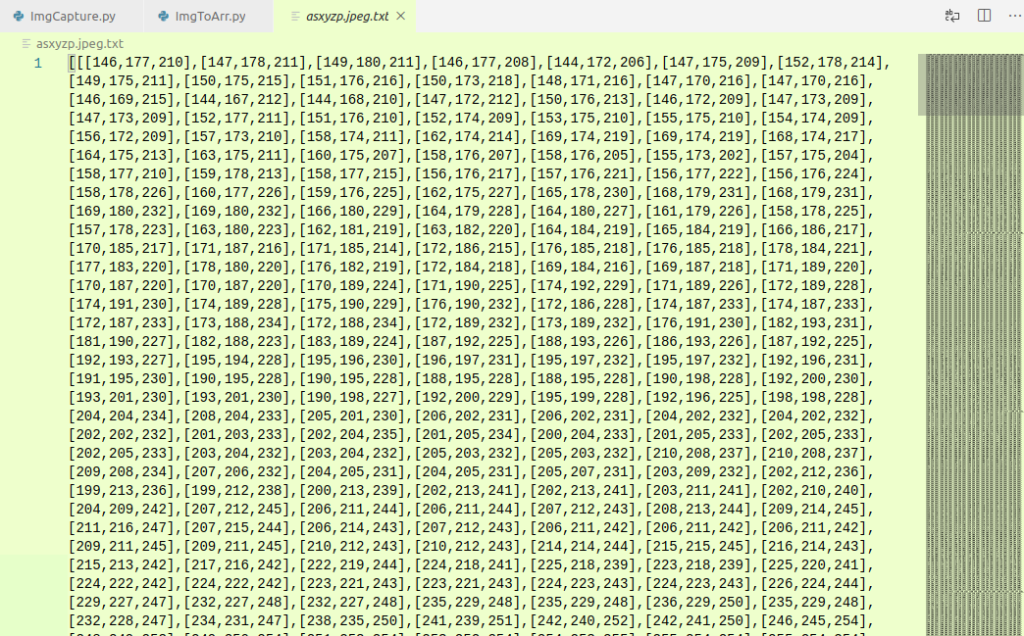
Once the image is loaded and we’ve obtained the NumPy array, which contains the pixel values [R,G,B] in the frame, then, individual row elements have to be obtained by iterating through the array and concatenating the values to a string. Once this is done, then the above-concatenated string needs to be appended to the text file using open(nameOfFile+".txt",'a+').
The above explanation is coded as:
import sys
import cv2
import os.path
#GETTING NAME OF IMAGE FILE TO BE LOADED
nameOfFile = input("NAME OF FILE (W/ FILE TYPE)? ")
#CHECKING WHETHER THE IMAGE FILE EXISTS OR NOT
if os.path.isfile(nameOfFile):
    #READING IMAGE FILE & STORING IT IN NUMPY ARRAY
    Frame = cv2.imread(nameOfFile,cv2.IMREAD_COLOR)
    #STORING ROW & COLUMN COUNT
    ImgRow = len(Frame)
    ImgCol = len(Frame[0])
    #TEMPORARY VARIABLE FOR LOOPING
    ImgR = 0
    #a+ => OPENING FILE IN READ + APPEND MODE
    ImgArrObj = open(nameOfFile+".txt",'a+')

    #STRING FOR CONCATENATION OF ROWS
    RowStr = '['
    #TRAVERSAL & CONCATENATION
    while ImgR < ImgRow:
        #TEMPORARY VARIABLE FOR LOOPING
        ImgC = 0
        #STRING FOR CONCATENATION OF COLUMNS
        ColStr = '['
        while ImgC < ImgCol:
            #STORES A SINGLE PIXEL
            PixStr = '[' + str(Frame[ImgR][ImgC][0]) + ',' + str(Frame[ImgR][ImgC][1]) + ',' + str(Frame[ImgR][ImgC][2] ) + ']'
            #APPENDS NON-LAST PIXEL TO A COLUMN
            if ImgC < ImgCol -1:
                ColStr = ColStr + PixStr + ','

            #APPEND LAST PIXEL TO A COLUMN
            elif ImgC == ImgCol -1:
                ColStr = ColStr + PixStr
            ImgC += 1
        #APPENDS NON-LAST ROW
        if ImgR < ImgRow -1:
            ColStr+='],'
        #APPENDS LAST ROW
        elif ImgR == ImgRow -1:
            ColStr+=']'

        RowStr += ColStr
        ImgR += 1
    #STORING
    RowStr+=']'
    ImgArrObj.write(RowStr)
    print("\n\nPROCESS COMPLETED.\nIMAGE STORED IN ",nameOfFile,".txt")
#WHEN IMAGE FILE DOES NOT EXISTS
else:
    print(nameOfFile+" NOT FOUND")
    sys.exit(1)
Output

Summary
Here’s a small summary of all the different functions used in the program:
time.sleep(N): Stops the execution of program for N seconds.cv2.VideoCapture(index): Returns a photo object which can be used to access the captured image and release the access to camera hardware, where, the index parameter sepcifies the device from which the image should be captured.cv2.VideoCapture(index).read(): Returns a tuple with boolean value indicating whether the image was captured properly or not and the photo frame itself.cv2.imwrite(nameOfFile,frame): Storing a photo frame in a file, where, nameOfFile is the name of the file to which the image will be written & frame is the photo frame (stored as numpy array) which will be converted into an image.os.path.isfile(nameOfFile): Checking the existence of file, where, nameOfFile is the name of the file which is passed as a parameter.cv2.imread(nameOfFile,FLAG): Reading an image file and storing it in numpy array, where, nameOfFile is the name of the image file from which the image is supposed to be read & FLAG is the paramter which decides whether the image will be imported as a color image, a greyscale image or an image without any chages.open(nameOfFile+".txt",'a+'): Opening a file in read + append mode [3].
In my next exploration session, I would try to do more experiments with images such as generating random images & more. Bye for now.
